

Notice something a little off with your loved ones rolling walker? Maybe the brakes feel spongy when squeezed, or worse, the wheels still roll slightly even after pushing the brake handles all the way down into the locked parking position.
When you are caring for an aging parent, a loose walker brake is an immediate safety concern. Walkers and rollators are mobility lifelines, but they can quickly turn into a fall hazard if they fail to hold firm when your loved one tries to stand up or sit down.
You do not need to haul the walker to a medical supply shop or spend money on a service call to fix this. In most cases, tightening walker brakes is a simple DIY project that takes less than ten minutes with basic household tools.
This guide walks you through how to tighten walker brakes so you can have total peace of mind.
Why Walker Brakes Lose Tension Over Time
If your parent’s walker brakes worked fine six months ago, you might wonder why they suddenly feel loose. It is rarely a defect in the equipment.
Brake cables, which look and act a lot like bicycle brake cables, naturally stretch a tiny bit over time with regular use. Every time your parent squeezes the brake loops to slow down or pushes them down to lock the wheels for a rest, the inner steel cable experiences tension.
Environmental factors play a role, too. Changes in temperature, humidity, and regular folding and unfolding of the walker frame can cause the adjustment nuts to back out slightly.
Catching this early is part of the rhythm of caregiving. Making brake checks a regular part of your routine protects your loved one from unexpected slips.
Tools You Will Need Before You Start
Before you begin adjusting, gather a few common tools. Having everything nearby makes the process quick and frustration-free.
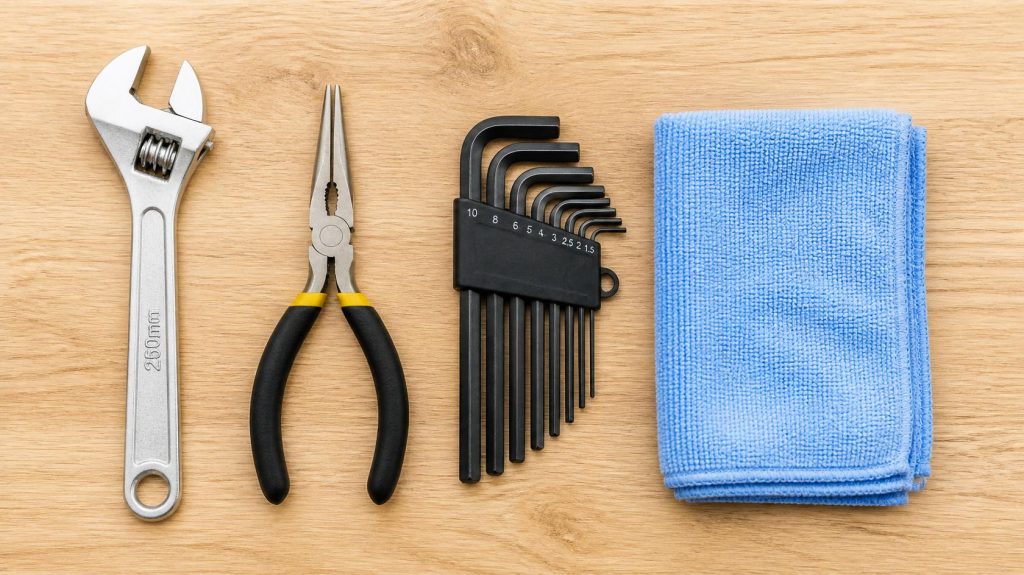
- A small wrench or adjustable wrench: Usually needed for loosening and tightening the cable lock nuts.
- A pair of pliers or needle-nose pliers: Helpful for gripping or pulling stubborn cables if there is too much slack.
- An Allen key (hex key) or screwdriver: Depending on your specific rollator brand (such as Drive Medical, Nova, or Medline), some models use small screws to anchor the cable.
- A clean rag: To wipe down dusty or gritty parts near the wheels.
Step-by-Step Guide: How to Tighten Walker Brakes
Most modern rolling walkers use loop-lock brakes. You squeeze them upward to slow down and push them downward to lock the wheels.
The adjustment process involves removing the slack from the brake cable so the brake shoe clamps down firmly against the rubber tire or wheel rim.

Step 1: Inspect the Current Brake State
Start by testing both sides independently. Squeeze the brake handle and push it into the locked position. Try to push the walker forward while it is locked.
If the wheels still skid or turn, note which side is failing. Often, one side stretches out faster than the other, causing the walker to pull or feel uneven.
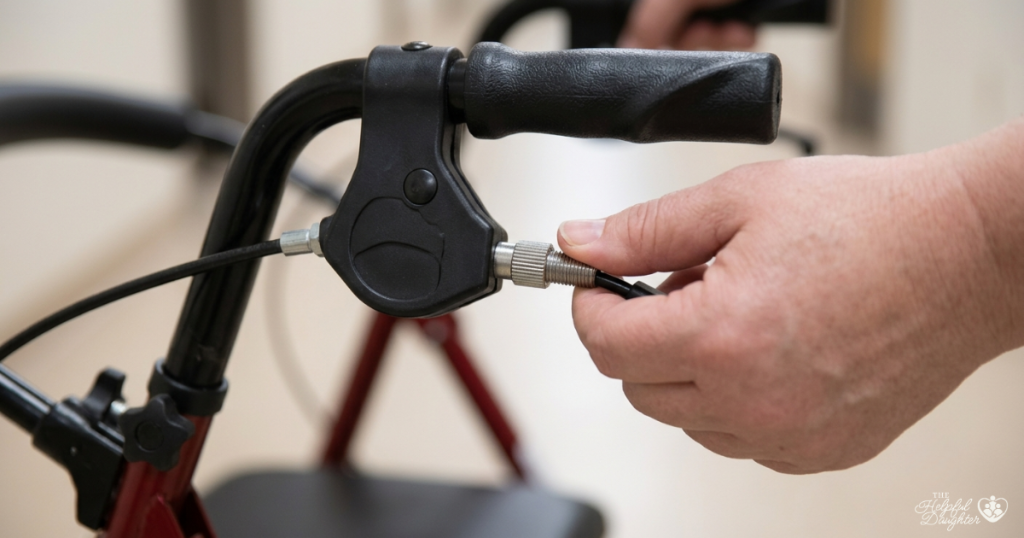
Step 2: Locate the Upper Barrel Adjuster
Look near the top of the brake handle or just below where the cable enters the housing. You will usually find a small plastic or metal barrel adjuster with a locking nut.
- Loosen the small lock nut by turning it away from the housing (usually clockwise relative to the nut).
- Turn the barrel adjuster counterclockwise to increase cable tension. Turning it outward pulls the cable tighter, bringing the brake pad closer to the wheel.
- Make small adjustments—about half a turn to a full turn at a time.
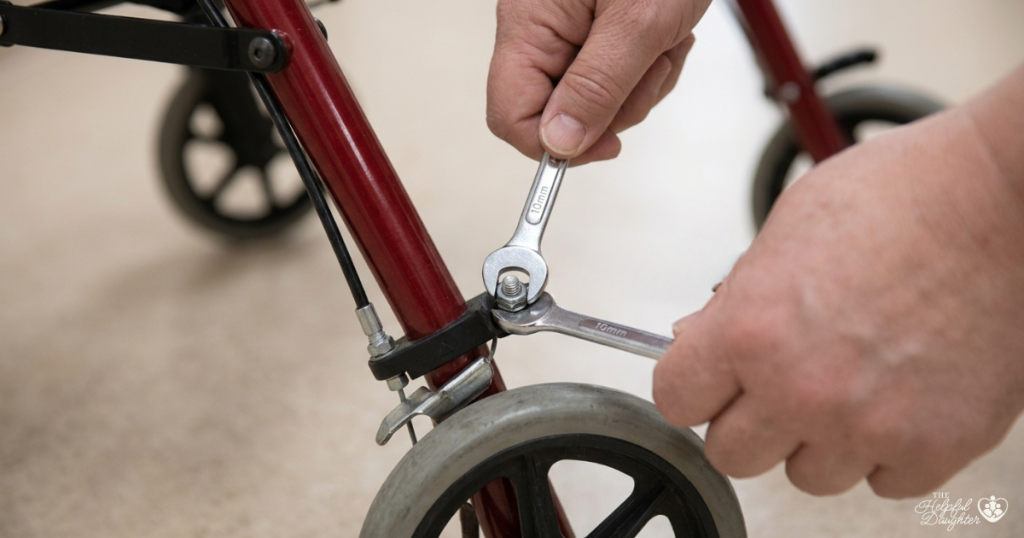
Step 3: Use the Lower Cable Adjuster (If Needed)
If turning the upper barrel adjuster all the way out still leaves too much slack, you will need to adjust the lower cable anchor closer to the rear wheel assembly.
- Locate the lower cable anchor bolt where the cable meets the metal brake arm near the wheel.
- Use your wrench to hold the bolt while using pliers to gently pull any excess slack out of the inner cable.
- Firmly tighten the cable fastener screw down while holding the cable taut.

Step 4: Test and Fine-Tune
Once you have secured the cable, test the system thoroughly:
- The Roll Test: Roll the walker normally. The wheels should spin freely without a constant scraping sound or drag.
- The Squeeze Test: Squeeze the handles. The walker should slow down smoothly and progressively.
- The Lock Test: Push the loops down into the parked position. Try to push the walker forward. The rear wheels should lock completely and refuse to turn.
Quick Caregiver Tip
Always perform brake adjustments on a flat, dry surface with the walker empty. Never try to adjust the hardware while your parent is sitting or leaning on the walker.
Comparison Table: Common Walker Brake Styles and Adjustments
Different walker models handle tension adjustments slightly differently. Refer to this quick-reference table to identify your parent’s equipment type.
| Walker Brake Type | How It Locks | Where Adjustment is Located | Primary Adjustment Tool |
|---|---|---|---|
| Loop-Lock Brakes (Most Common) |
Push down on loop handles until they click | Upper barrel near handle or lower wheel arm | Fingers, small wrench, or pliers |
| Push-Down Brakes (Spring-Loaded) |
User presses their body weight down on the frame to engage rubber feet/pads | Directly on the central spring or shaft mechanism | Allen key / Hex wrench |
| Bicycle-Style Hand Brakes | Squeeze lever and flip a small parking pin down | Along the brake lever housing or cable line | Phillips screwdriver & wrench |
Troubleshooting Common Walker Brake Issues
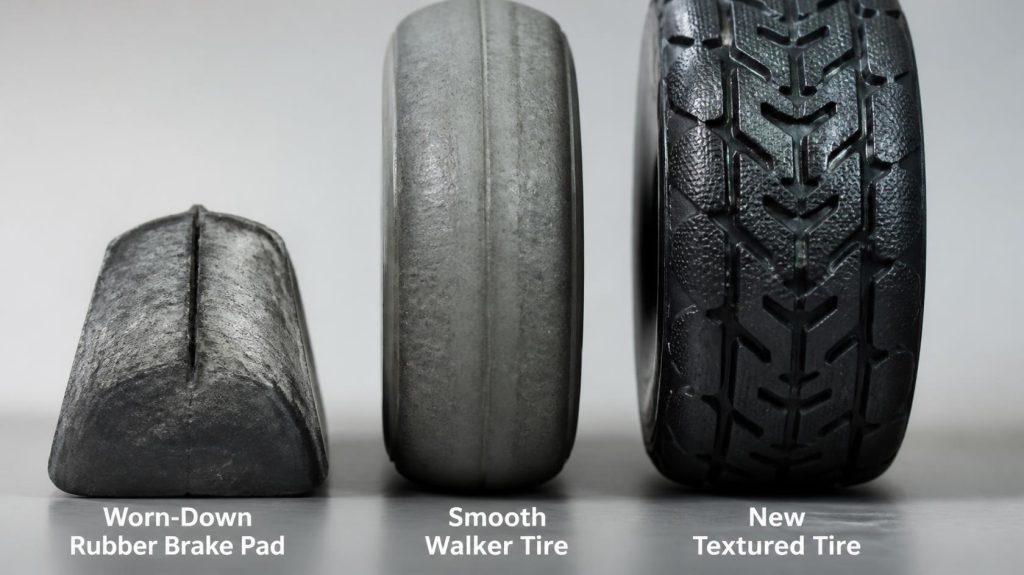
Sometimes, simply tightening the cable does not completely solve the problem. Here are a few situations you might run into and how to handle them.
The Brakes Still Slip Even When Tightened All the Way
If you have adjusted the cable tension to its maximum limit and the brakes still fail to hold, inspect the physical brake pads. Over years of rubbing against the tire rubber, the textured plastic or rubber brake shoes can wear down flat. Additionally, if the rear tires have worn completely smooth, the brake pad will have nothing to grip. Check the tread and replace worn tires or brake shoes promptly.
One Wheel Grinds or Drags Constantly
If you cranked the tension too high on one side, the brake pad will constantly drag against the wheel, making the walker exhausting for your parent to push. Back the adjuster clockwise slightly until the wheel spins freely when the brakes are disengaged. Balance is key—both sides should require equal effort to squeeze.
The Cable is Frayed or Kinked
Safety is paramount. If you notice tiny metal wires sticking out of the brake cable (fraying) or if the cable housing is severely bent or crushed, do not attempt a temporary fix. Order a replacement cable kit from the manufacturer or take the walker to a local medical supply store. Broken cables snap under pressure, which can cause a sudden fall.
When to Replace Instead of Repair
If your rolling walker is more than five years old, has rusted frame joints, or requires constant cable tightening every single week, the internal components have likely reached the end of their safe lifespan. Consider replacing the unit entirely to ensure your parent’s safety.
Final Thoughts on How to Tighten Walker Brakes
Taking ten minutes out of your day to inspect and tighten your parent’s walker brakes might seem like a small task, but its impact on their daily safety and confidence is huge. A rolling walker should always be a reliable foundation for balance—never a source of unexpected slips or hesitation.
By making simple brake checks a regular part of your caregiving routine, you prevent minor slack from turning into a sudden fall hazard. Remember, if an adjustment ever feels beyond your comfort level or if hardware components look worn out, reaching out to a local medical supply specialist or purchasing a certified replacement part is always the safest path forward.
Frequently Asked Questions
How do I know if my walker brakes need to be tightened?
You will know walker brakes need adjustment if the brake handles feel loose or spongy when squeezed, or if the wheels still rotate when the brake loops are pushed down into the locked parking position. If your parent feels unsteady because the walker creeps forward when they try to sit down or stand up, check the tension immediately.
Can I tighten walker brakes without any special tools?
For minor adjustments, you can often turn the plastic barrel adjuster near the handle by hand. However, most adjustments require a basic adjustable wrench, pliers, or an Allen key to loosen lock nuts and pull the inner cable taut so it stays secure during daily use.
Why do my rollator brakes loosen up so often?
Brake cables naturally stretch over time as the inner steel wire experiences tension from daily squeezing and locking. Regular folding and unfolding of the walker frame, temperature shifts, and routine wear also cause adjustment nuts to drift out of place slightly over a period of months.
What should I do if tightening the cable doesn’t stop the wheel from rolling?
If the cable is as tight as it will go and the wheel still slips, examine the rubber brake pad and the tire tread. Over time, these surfaces wear down smooth. If the brake shoe is worn flat against the metal bracket, you will need to order replacement brake pads from the walker manufacturer.
Is it safe for my parent to use the walker while I adjust the brakes?
Never perform maintenance while your parent is sitting on the walker or using it for support. Always set the walker on a flat, stable surface, empty any items from the under-seat basket, and complete the testing process yourself before handing the walker back to your loved one.
How often should I check my parent’s walker brakes?
It is best to test the parking locks and inspect the cables at least once a month. Because seniors rely heavily on their mobility devices for balance, catching a stretching cable early prevents unexpected slips or sudden mechanical failures.
Can I use bicycle brake cables to fix a medical rollator?
While rollator brakes look and function similarly to bicycle brakes, it is always safest to purchase replacement cables directly from the walker manufacturer or a certified medical supply retailer. Walker cable lengths, end fittings, and housing diameters can vary significantly between brands.
What is the difference between loop brakes and push-down brakes?
Loop brakes are hand-operated bicycle-style levers that you squeeze to slow down and push down to lock. Push-down brakes do not use hand levers; instead, the user’s body weight presses the frame downward, causing rubber tips or spring-loaded pins to grip the floor or wheels directly when weight is applied.